Exercise 5.2.2 - Technical Specifications and Pricing
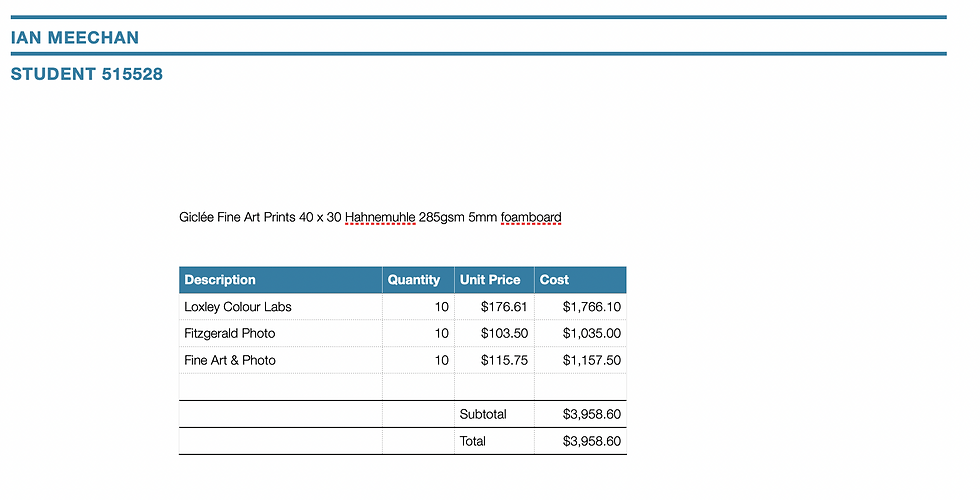
For this exercise I was asked to produce 3 quotations from professional photography labs and a mock final print for display in a gallery. Finally I was asked if inkjet can be treated as a photograph? I chose a Giclee Fine Art Prints 40x30 as my example print.
Exercise 5.2.1 Produced 3 quotations from:
Loxley Colour Labs in the United Kingdom
Fitzgerald Photo in Australia
DigiDirect in Australia
Exercise 5.2.2 Required the technical specifications required to submit images for printing to the requested :
Preparing files for print
Everything you need to know to prepare your files for printing with Loxley Colour.
The following guide includes instructions and recommend file properties when preparing your image files for print.
Colour / Working Space
Images should be saved as 8-bit JPEGs and use either sRGB, Adobe RGB or Pro Photo PGB colour spaces.
File Names
The following illegal characters should be avoided. ! < > * ~ # % & + , : ; ‘ “ { } [ ] Limiting filenames to alphanumeric characters is good practice, while using an underscore as a separator is also perfectly acceptable. Rachel_Mark_001.jpg is an example of a suitable filename.
Character Length
Please ensure filenames do not exceed 30 characters in length.
File Sequencing
Where the running order of printed images is important it is wise to number your files consistently.
File Format
High quality JPEGs are perfect for submitting to photographic labs for optimum print quality whilst also ensuring your files are compatible with the majority of commercial print devices. When saved at a high quality setting, the associated JPEG compression is unnoticeable when compared with TIFFs. When exporting your final image for print, we recommend using a Photoshop compression level of 10 (11 & 12 offer no quality benefit but do increase file size exponentially) and a quality setting of between 93 and 100 when exporting from Lightroom. Images should be edited in RAW, TIFF or PSD format and only exported as JPEG when ready to submit for printing.
File Size
Images should ideally be sized at the required print dimensions at 300ppi (pixels per inch) and saved at Photoshop Level 10 JPEG as Baseline (Standard). However, lower resolutions can still result in a high quality print*. *Resampling / Interpolation (adding pixels) to an image will not necessarily improve the print quality.

How to prepare your files for print
Please supply files for printing as follows:
8 Bit RGB files not CMYK.
.tif or .jpeg (minimum compression level 8). (.jpeg for online orders only)
No layers or additional channels (eg. alpha channels).
250 - 300 ppi sized at the correct dimensions for the print required.
Embedded working colour space (eg. Adobe RGB or sRGB).
File names less than 10 characters long.
Avoid using "&*,(??<> characters etc.
Please prepare multiple files for printing as follows:
Arrange files in folders according to print output sizes, quantity, borders, surface etc.
Main Folder:
your name
Sub Folders:
size of prints required
quantity if more than one
specify cm or inches
specify borders if required
printing surface required eg. metallic, gloss etc

File Preparation
File set-up
Make sure your image is sized correctly to your final print size. For example: if you want an A3 print, your file should be sized to 297mm x 420mm, this should include any border around your image.
Files should have as resolution of 300dpi or higher at final print size (we can accept files of 240ppi at final print size)
We accept the following files:
JPEG (8bit)
PSD
TIFF (16bit)
We do not accept RAW files.
File images can be sent in either RGB colour space or (CMYK is a bit old school and we don’t use it anymore). Please ensure all files are ‘flattened’.
Sending Your Files
You can use our handy upload button or we accept files using:
WeTransfer
Dropbox (please name your folder ‘Your Name with Image Name)
Hightail
File Upload via our Order Form
We cannot accept files embedded / attached to emails unfortunately.
If your file is incorrect (size, specified border but no border when sent), we will contact you. You can either amend the file yourself and resend it or, with your emailed permission, we can do the final prep for you at $5 per file.
Registration/crop marks
We’d love registration lines around the images so we know where to trim (especially handy if you have white borders or have an image that has a lot of white).
Here’s a little How To:
With the image highlighted now go to “Edit” and down to “stroke” – width 2px, colour black, location ‘outside’, blending normal and opacity 100%
Click “ok”
Go to “layer” and click ‘flatten image”
Go to “save as” and save as a JPEG

Exercisie 5.2.3 - Can inkjet be treated as a photograph?
Let's consider a photograph and search online for the results. Most results state the following. A photograph is made by a camera, in which an image is focused on light-sensitive material and then made visible and permanent by chemical treatment or stored digitally.
This process of capturing a photograph, until recently, was a chemical process and the same for developing a photograph. The physical method of producing a photograph has changed since its inception, for example, silver halide, dye sublimation and inkjet.
The introduction of digital technology has changed how we capture, store and output images and is constantly changing and evolving.
I believe an inkjet print is a photograph, as the only difference is the process that created it.
References: https://www.google.com/search?q=photograph+definition&oq=photograph+definition&aqs=chrome..69i57j0i512l2j0i15i22i30j0i22i30l6.5878j1j7&sourceid=chrome&ie=UTF-8
Comments